Hibernate 5 Kotlin Quick Start

This tutorial will get you using Hibernate with Kotlin quickly!

I have run into situations where I just simply want to write a simple application that has Hibernate support, without having to use a full stack such as Spring Boot. It’s not hard to get going, but there are a few things to think about such as configuring Hibernate properly and managing your own transactions. The good thing is that this doesn’t take a lot of effort, as I will show you in the following tutorial.

Dependencies

To get started, here is a basic pom.xml file that will show you what dependencies you need.

dependencies {
    compile 'org.hibernate:hibernate-java8:5.4.4.Final'
    compile 'org.hibernate:hibernate-c3p0:5.4.4.Final'
    compile 'org.jetbrains.kotlin:kotlin-stdlib-jdk8:1.3.41'
    compile 'org.jetbrains.kotlin:kotlin-reflect:1.3.41'
    compile 'com.h2database:h2:1.4.199'
    compile 'commons-io:commons-io:2.6'
    compile 'org.apache.logging.log4j:log4j-api:2.12.1'
    compile 'org.apache.logging.log4j:log4j-core:2.12.1'
    testCompile 'org.jetbrains.kotlin:kotlin-test:1.3.41'
}

Properties File

Next we need a properties file that will hold our Hibernate configuration

driver=org.h2.Driver
url=jdbc:h2:~/roms
user=root
pass=root
dialect=org.hibernate.dialect.H2Dialect
showSql=false
formatSql=true
currentSessionContextClass=thread
ddlAuto=validate

# Needed for a connection pool
hibernate.c3p0.min_size=1000
hibernate.c3p0.max_size=2000
hibernate.c3p0.timeout=120
hibernate.c3p0.max_statements=2000

This properties file will create an embedded H2 database. It also defines a connection pool, which is required in programs that use multiple threads, which mine often  do. If you want to see the SQL that is generated, then you should flip the showSql property to true.

Entity Class

Hibernate maps objects to database tables, which means that we need an entity class.

data class AnEntity (
        @Id @GeneratedValue
        val id: Long? = null,
        val name: String? = null
)

Boot Strapping Hibernate

At this point, we are ready to begin configuring Hibernate.

Reading the Properties File

Let’s begin by reading our properties file into memory. Here is a nice little Kotlin function that we pull a properties file from the resource folder.

fun propertiesFromResource(resource: String): Properties {
    val properties = Properties()
    properties.load(Any::class.java.getResourceAsStream(resource))
    return properties
}

Convert Properties file to Hibernate Properties

Our next step is to read the information in the properties file and turn it into a Properties object that can be consumed by Hibernate. We can use Kotlin’s extension function feature to make this easy.

fun Properties.toHibernateProperties(): Properties {
    val hibernateProperties = Properties()
    hibernateProperties[Environment.DRIVER] = this["driver"]
    hibernateProperties[Environment.URL] = this["url"]
    hibernateProperties[Environment.USER] = this["user"]
    hibernateProperties[Environment.PASS] = this["pass"]
    hibernateProperties[Environment.DIALECT] = this["dialect"]
    hibernateProperties[Environment.SHOW_SQL] = this["showSql"]
    hibernateProperties[Environment.FORMAT_SQL] = this["formatSql"]
    hibernateProperties[Environment.CURRENT_SESSION_CONTEXT_CLASS] = this["currentSessionContextClass"]
    hibernateProperties[Environment.HBM2DDL_AUTO] = this["ddlAuto"]

    //C3PO
    hibernateProperties["hibernate.c3p0.min_size"] = this["hibernate.c3p0.min_size"]
    hibernateProperties["hibernate.c3p0.max_size"] = this["hibernate.c3p0.max_size"]
    hibernateProperties["hibernate.c3p0.timeout"] = this["hibernate.c3p0.timeout"]
    hibernateProperties["hibernate.c3p0.max_statements"] = this["hibernate.c3p0.max_statements"]

    return hibernateProperties
}

Building a Hibernate Configuration

Hibernate requires a configuration. We can use the Properties object that we made in the last step as input for creating a Hibernate configuration. Additionally, we need to supply class objects for any classes that we need Hibernate to manage. It’s best to supply this as a vararg.

fun buildHibernateConfiguration(hibernateProperties: Properties, vararg annotatedClasses: Class<*>): Configuration {
    val configuration = Configuration()
    configuration.properties = hibernateProperties
    annotatedClasses.forEach { configuration.addAnnotatedClass(it) }
    return configuration
}

Build a SessionFactory

The SessionFactory is the outcome of all of this work. It requires a Configuration in order to be created, but once you have a Configuration, it’s easy to get going in Hibernate.

fun buildSessionFactory(configuration: Configuration): SessionFactory {
    val serviceRegistry = StandardServiceRegistryBuilder().applySettings(configuration.properties).build()
    return configuration.buildSessionFactory(serviceRegistry)
}

Transactions

Hibernate is often used in environments where a container, such as Spring, manages your transactions automatically. In this case, we need to manually manage transactions, but Kotlin makes it really easy to eliminate the boiler plate code that would normally be required. Here is a nice little function that allows you to manage your transactions.

fun <T> SessionFactory.transaction(block: (session: Session) -> T): T {
    val session = openSession()
    val transaction = session.beginTransaction()

    return try {
        val rs = block.invoke(session)
        transaction.commit()
        rs
    } catch (e: Exception){
        logger.error("Transaction failed! Rolling back...", e)
        throw e
    }
}

Shutdown Hook

The final house keeping item is to make sure that we close our SessionFactory when we are finished. We can tap into the JVM’s shutdown hooks to make sure that our database connection has been closed properly.

fun addHibernateShutdownHook(sessionFactory: SessionFactory)  {
    Runtime.getRuntime().addShutdownHook(object: Thread() {
        override fun run() {
            logger.debug("Closing the sessionFactory...")
            sessionFactory.close()
            logger.info("sessionFactory closed successfully...")
        }
    })
}

Demonstration

Let’s wrap this up with a nice little demonstration program that puts all of this into action!

fun main(){
    val properties = propertiesFromResource("/database.properties")
    properties["url"] = "jdbc:h2:mem:test" //Override the properties to make an in memory db

    val configuration = buildHibernateConfiguration(properties.toHibernateProperties(), AnEntity::class.java)
    val sessionFactory = buildSessionFactory(configuration)
    addHibernateShutdownHook(sessionFactory)

    sessionFactory.transaction { session ->
        session.save(AnEntity(name = "Birdie"))
    }

    val entity = sessionFactory.transaction { session ->
        session.createQuery("from AnEntity").uniqueResult() as AnEntity
    }

    println(entity)
}
Sources

https://hibernate.org/orm/documentation/5.0/

https://kotlinlang.org/docs/reference/

Antivirus Software

What is antivirus software and what does it do?

Just about every user has heard about computer viruses. According to Norton, a computer virus is computer code that will manipulate how a computer acts and will also try to reproduce itself so that it spreads to other systems. However, it is important to note that a computer virus is only one small category of malware. Malware is a term that is used to describe malicious computer software and includes terms such as viruses, worms, Trojan horses, etc. In today’s computing world, we use antivirus software to detect and remove computer viruses. However, most antivirus (AV) software detects and protects against a large category of malware which includes viruses. This post will explain briefly how AV programs work, how effective they are, and what their limitations are as well.

What is Antivirus Software?

Specifically speaking, AV programs are programs that detect and protect your computing environment from computer viruses. However, this is too narrow of a definition to describe modern AV programs. Instead, we often call such programs as Anti-malware programs since most AV tools protect our systems from more than just viruses. There are AV tools that run on just about every major computing platform, which means that you will find them for Windows, macOS, and Linux variants. It is also important to note that malware exists for non-desktop computing platforms as well, so you will also find AV tools for iOS and Android devices as well.

1502946408

Some platforms are more prone to malware than others. For example, the Windows Operating system has been a malware target for years. Recently, the Android operating system has become a popular target for malware. The platform doesn’t even have to be an operating system. For example, malware has been know to target virtual machine platforms such as the Java Virtual Machine. There are a variety of reasons while some platforms tend to be more targeted than others, but market share is known to be a reason because attackers tend to look for the highest amount of return for their efforts so it makes sense that they would target more highly used platforms. Windows is the most popular desktop environment and Android is the most popular mobile environment so it stands to reason why these environments are attacked more often by malware.

However, it’s a commonly held misconception that other platforms are more secure due to the fact that they have less malware. This is simply wrong. It is true that a person using a variant of desktop Linux is much less likely to be targeted by malware, but this does not mean that the platform is more secure than other platforms. There are are a lot of factors that determine how secure or insecure a platform is and many of those factors have to do with configuration and what permissions are running on the computing environment. This means that you still need an AV program or toolkit running on your platform regardless of what it is.

Antivirus Software Detection Schemes

In order for AV to work, it needs to be able to tell the difference between legitimate computer code and malicious code. Different AV tools use different means to accomplish this task and in some cases will even combine different kinds of identification techniques. Each identification scheme has its benefits and limitations but they can be broken down into the following categories.

Behavior Based Detection

Some AV tools try to identify malware based on what it does. This is known as behavior-based detection. Some kinds of behaviors are known to be malicious. For example, a program that tries to change Windows registry settings or overwrite Unix system log files will generally be considered to be suspicious. The same may hold to be true for programs that attempt to open ports in a firewall or make remote connections to other computers in the background. A behavior-based detection system will attempt to monitor a program for such behaviors and alert a user if there is a match.

One way behavior-based detection works is through sandboxing, where a computer program is loaded into a special virtual machine that is referred to as the sandbox. The AV will consider the program to be safe as long as it is operating inside of the permission boundaries of the sandbox. Any behaviors that attempt to bypass the restrictions of the sandbox are considered to be suspicious.

1536531990

The main drawback of sandbox detection is that it is resource intensive. Running every program in a sandbox can be taxing on the computer’s hardware and may consume an excessive amount of memory, network, disk, and processor resources. The technique is starting to be more common on high-end hardware but sandboxing may not be an option for many users at this time.

Another form of behavior monitoring involves artificial intelligence, where the AV attempts to learn about software’s behavior in order to determine if the software is safe to use. AV based on artificial intelligence is still in its early stages so it is not common to see consumer AV packages based on this technology. Nevertheless, cloud-based AV tools may incorporate machine learning in order to study and analyze programs that are malicious.

Signature Based

Every computer program will produce a unique signature that can be thought of like a fingerprint for the program. A signature-based AV tool simply maintains a registry of allowed and banned program signatures. When you initiate a scan of your system, the AV tool will analyze the signature of all executable code it finds on the system and then checks it against its database. Positive matches of banned fingerprints are quarantined and the user is alerted.

This is with this approach is that it is reactive. Most people who write malware will know to check their program against commonly used AV tools in order to avoid detection and its upon the malware vendor to go out and find malware to study and update their databases of whitelisted and blacklisted programs. Furthermore, the user needs to update their machine and maintain the latest version of the AV tool and related files that the AV tool needs.

1540798457

However, the signature-based approach has noticeable benefits that should not be ignored either. For one thing, there are lots of old malware that still floats around the internet that is still harmful to machines that are not protected. A signature-based AV will know about such malware and protect you accordingly. Also, many commercial and open source AV tool publishers are constantly studying software and looking for malware in order to maintain their tools. Signature-based AV scans your system quickly and does not use a lot of system resources either. Finally, many signatures based AV tools can be purchased at a low cost.

Heuristic Based

Heuristic-based approaches are similar to signature-based approaches, but the difference is that a heuristic based AV tool looks for a family of malware as opposed to a specific fingerprint. This approach tends to use a pattern matching and wildcards in order to prevent a malware writer from padding their code with empty instructions or bytes in order to avoid AV detection. It’s also easy to combine heuristic detection with signature-based detection in order to make a more comprehensive AV tool.

One advantage of heuristic-based AV tools is that they can detect a family of malware. Many malware programs are polymorphic, which means they adapt and change their configurations in order to avoid detection. Worms are one such example since they tend to spread and will morph along the way as they spread. Packagers can also be used to slip malware pass an AV tool as well. By using wildcards and pattern matching, a heuristic based scanner can catch such schemes and isolate malware.

Of course, heuristic-based scanning still requires a current version of the AV tool and known fingerprints to work. While they may not need an exact match of the fingerprints, the heuristic based scanner still needs to know what sort of fingerprints to search for in order to perform fuzzy scanning on computer code. For this reason, it’s still possible for malware to avoid detection even when using a heuristic based AV tool. There is also a possibility for more “false positive” where a legitimate program can be treated as a malicious one in the event that the program’s fingerprint falls within the boundaries of the scanner.

Antivirus Software action upon detection

Once the AV detects malware, it needs to decide what to do with it in order to keep you safe. This behavior will be highly dependent upon the AV tool that you decide to use. However, there are a few different actions that can be taken by the AV once it has determined that you are getting attacked by malware.

Quarantine

At a minimum, the AV tool will quarantine the file that contains the malicious code. It can do this by using permissions or performing manipulations on the file in order to render it inoperable. Generally speaking, the infected file will get moved to a special folder on your hard drive and the AV tool will rename the file so that you don’t double click on it or execute the program. This will keep you from running the file and keep the code from getting executed. Some AV programs will also ask you to send the file to them for further analysis so that the strength of the AV tool gets improved as well.

Block the Action

1535604621

A more advanced AV tool can even interrupt the execution of the malware. For example, if a program attempts to make an unauthorized change to a system file, the AV program may instruct the operating system to kill that process immediately. In other cases, the AV program may flash a confirmation dialog to the user asking if they want to grant permission to program in order to change the protected area of the machine. This can be useful to administrators who are using legitimate programs to perform necessary actions.

Restore the System

Malware, by its very nature, attempts to damage the target system by impacting the confidentiality, integrity, and availability of the target. In some cases, the AV tool can attempt to restore the system after it has been attacked by malware. This can be done by maintaining backups of critical system files in a safe place or it can try and remove the bytes that were adding to a file by the malware.

Restoration is important because it can stop the malware from spreading. For example, a macro-virus (a virus that is stored in an MS-Word document or similar software) may infect a legitimate office document that is going to get shared to other users. In some cases, the AV tool may be able to remove the malicious script from the file so that users can safely open it. This will stop the malware from spreading to additional victims.

Conclusion

No computer system is safe without antivirus software. Antivirus software works by detecting, quarantining, and restoring the system to a safe state. All computing environments are susceptible to malware so no one platform should be considered to be safe to use without some sort of AV tool running on it. You should also keep in mind that mobile devices and IoT devices are also susceptible to malware.

If you use a computer system that does not have an antimalware tool, then you are putting yourself and other people at risk. Even if you believe your system is safe, you can still be used as a conduit to transmit malware to other people. There are lots of different antivirus tools that are available on the market and even for free. Although some antivirus software works better than others, the reality is that you are better off having some degree of protection rather than no protection at all. Antivirus software is a critical component of computer security so you should always make sure that you have it and keep it up to date.

Sources

Antivirus Software, Wikipedia

Symantec Employee, What is a computer virus?

What does Malware Do?, Comodo

Peter M. Mell, Karen Kent, Joseph Nusbau, Guide to Malware Incident Prevention and Handling, NIST

Charlie Osborne, Crisis malware targets virtual machines


Software Security

A brief introduction to software security.

The software is an integral part of our lives, but time and time again, we hear on the news about data breaches. The frequency of such breaches seems to increase on a regular basis as well as the scale and impact of them. This may lead some people to think that software protection isn’t taken seriously. However, in my experience, there seem to be other reasons for insecure software. In this post, I will attempt to explain my experiences regarding software defense. While the reasons for insecure software are endless, a few categories seem to come to mind. Let’s walk through some of the more common ones and see if we can figure out the reasons for insecure software.

Iron Triangle

1920px-Project-triangle-en.svg

Every software project has three constraints that determine how much work can be done on the system. Those constraints are:

  • Scope
  • Resources (Cost)
  • Time

Scope refers to the work that is going to be done on the project. A project that has a large scope will require more work and conversely, a project that has a smaller scope requires less work. Resources are materials, money, people, and other inputs that are needed in order to develop a project. It is related to scope in the sense that more scope will require more resources, but keep in mind that inefficient project management can also lead to resources being wasted as well. Finally, there is time. Every project has deadlines and eventually the customer will want the deliverables.

All three of these resources are not finite. For example, you can ask for more time and resources, and likewise, the customer may wish to increase the scope of the project. However, this usually is a request for more features, not protection. Ensuring that system safety is something that everyone tends to pay lip service too, but until someone has actually experienced an incident, they are more likely to think of it as an afterthought rather than adopt a security first mentality.

Safety is a nonfunctional requirement and it requires time, resources, and scope to implement it properly. Hence, the iron triangle tends to get in the way of defense. It is often difficult to quantify the value of software assurance to stakeholders and thus, it can generally be seen as an uphill battle to encourage stakeholders to pay for it. Unlike features, protection isn’t something that users tend to see. A user simply expects safety to be present in the software. This leads to our next issue when it comes to creating safe IT systems.

Lack of Awareness

Security-And-Privacy

Management, users, and developers generally lack a proper understanding of secure IT systems, and this can lead to data breaches, denial of service, or other issues that impact the confidentiality, availability, and integrity of the system. While there are many reasons for this, a lack of security professionals in the workforce is certainly a problem. According to ISC2, there is a shortage of 3 million cybersecurity workers.

When we work with security aware people, we are more likely to become more aware of cybersecurity ourselves. However, a lack of cybersecurity people leads to a lack of voice at the table. For example, if management is planning out a system, they may not fully appreciate what is required in order to make a fully secured system unless there is somebody present to explain the cost, requirements, needs, and people resources that are needed to make a safe IT system.

Likewise, developers are under constant pressure to bring working code to the customer, but again, may not have the time, resources, training, or experience in order to make sure that they are producing a robust IT system. A lack of exposure to safety experts hinders a developer’s exposure to security and increases a lack of awareness. Project deadlines imposed by management may lead to developers skipping protection altogether in order to produce features for the customer. While many developers will acknowledge the importance of security, they rarely have a chance to learn about secure coding practices or even tend to overly rely on third-party libraries for safety.

Users are also a problem when it comes to cybersecurity. Many users simply do not follow safe IT practices. For example, users are constantly told not to use the same password for multiple websites yet many users do this on a regular basis. Web browsers will normally warn people not to browse to a site that has a certificate configuration issue, yet this is another thing that people are known to do. Finally, many people aren’t even aware that they should not connect to public WIFI hot spots without using a VPN. All of this leads to problems that can create information leakages.

There may not even be good engineering solutions to these problems. For example, when I write a website for a client, I will often download a list of known leaked passwords. Hackers love to publish such lists on the internet since they can be used in dictionary attacks. By using such a list myself, I can create code that prevents a user from using such a password and hopefully prevent brute force attacks. The problem is that they violate Psychological Acceptability because the user may be trying to use a password that conforms with the password requirements but still isn’t acceptable because it’s in the leaked password list. It can also create an illusion of defense since the password blacklist needs to be updated on a regular basis.

Of course, there are endless examples of a lack of safety awareness. The point is that such a lack of awareness impacts the quality of an IT system since there is a lack of knowledge as to how to secure a system. When project managers, developers, and users lack the expertise to secure a system, it will inevitably result in an IT system that is weak. Training and practice are the antidotes to such problems. The more that we train and expose people to secure IT practices, the stronger our systems will become.

Lack of Security Culture

2009-12-12-08.21

Lack of culture can certainly be related to a lack of awareness, but it can also come from attitudes and values in the organization. An organization will promote a safe IT culture when protection is brought up in meetings and acted upon. Unfortunately, many organizations lack the leadership that is necessary to build strong and safe systems and this results in weak systems.

An organization can look at software protection as a forethought or as an afterthought. In other words, they can be proactive or reactive. While common sense may dictate that we should be proactive, the reality is that many organizations tend to react to an incident. There are several (and this is non-exhaustive) reasons for this.

Attackers Strike Anytime

An attacker of a system has the luxury of being to strike at will at any time. The defender of a system has to be on guard twenty-four hours a day, seven days a weak. Most of an attacker’s time is spent in reconnaissance, which means that they are exploring the system and looking for weaknesses. Attackers have a variety of tools that they can use such as dumpster diving, social engineering, or using scripts.

Ultimately, it is the attacker that gets to decide when to conduct an attack and often times, the attack isn’t discovered until after it is complete and the damage is done. A good attacker will even cover their tracks by manipulating logs or masquerading as legitimate users so that they can keep coming back. While organizations can take preventative action to limit such an attack, the reality is that complete protection is utopian and eventually an attack will succeed. This will lead to a reactive approach to defense.

Cost

Securing a software system has a cost associated with it and the cost is generally seen as overhead. Preventative costs such as penetration testing, red team / blue team exercises, and phishing simulations may be seen as too expensive or unnecessary. Many managers are conditioned to believe that shareholder value is the only stakeholder that matters in an organization and may disregard anything that doesn’t maximize shareholder value. Furthermore, a lack of penalties and enforcement from the government may mean that managers disregard IT protection since a data breach may only impact users and not the manager.

In other words, managers may not see the benefits of safety as outweighing the risks. The cost of prevention is generally known upfront since you can easily request a quote from a penetration testing organization. However, the cost of a breach is generally known until after it occurs. This can cause management to become reluctant to pay for prevention and may lead to them taking a risk instead.

Lack of Expertise

A lack of expertise goes hand in hand with a lack of awareness that was discussed above. However, if we don’t have people in the organization that is trained in cybersecurity, then chances are high that we won’t have a safety culture either. Without training expertise, an organization will not know how to promote a safety culture in the first place, which leads to a reactive stance when it comes to addressing incidents.

What to do about it?

Of course, the above methods are not exhaustive by any means. There are real hurdles that need to be overcome in order to have an organization adopt a security-first mindset. However, there are a few things that can certainly help to produce software that is more secure. The first one is a commitment to protection.

When it comes to making a commitment to defense, it means that the organization has to be committed to producing truly secure software. This starts at the highest levels of leadership by setting an example. Senior management must take the time to educate themselves about IT security and understand what it means to be a secure organization. They must also include safety awareness and training as part of the interview process or training process in order to ensure that staff is trained in security practices. This may mean a change in recruiting and hiring practices.

It also means that a security policy is continually evaluated to ensure that it is up to date, works for the organization, and is acted upon. The U.S. government, Microsoft, and other large organizations often have publicly available models to follow, so it’s not as if an organization needs to start from the beginning. For example, OWASP has the SAMM project that is available for anyone who needs information on how to get started. You can also consider hiring consultants or investing in training for employees also.

Practice is also important. While having an incident response plan is important, it also just as important to go through the plan. A plan is simply a piece of paper until it is acted upon and in the event of an incident, people may not have time to read and understand what is expected of them. This is why proper preparation and planning is important.

Upfront security planning will also help to improve the security of software. For example, it’s important for an organization to conduct threat modeling, attack surface analysis, and security planning. This will help developers understand that is needed for them in order to create a safe and robust system and it will also improve security awareness and culture in the organization.

Follow through is critical as well. An organization must always be checking their work for security flaws. This can be achieved using techniques such as internal and external security audits, red hat / black hat exercises, and penetration testing. An organization can also conduct simulated social engineering attacks as well. Adding any such steps to the software engineering processes is bound to improve the security of the system and make the IT world a better and safer place.

Sources

“The iron triangle of planning”, Tareq Aljaber

“Cybersecurity Skills Shortage Soars, Nearing 3 Million”, ISC2 Management

“Dictionary Attack”, Wikipedia

Psychological Acceptability, Michael Gegick and Sean Barnum

SQL Injection

What is SQL Injection

According to OWASP, a SQL Injection attack is an attack where the malicious agent (user, bot, etc.) inserts an unexpected query into a client application. The results can be devastating due to the fact that the attack often runs with elevated privileges which can lead to the disclosure of sensitive data, creating admin user in the database, or startup and shutdown the DBMS. SQL Injection is one of many kinds of injection flaws and applications need to do due diligence to protect against them.

Demonstration

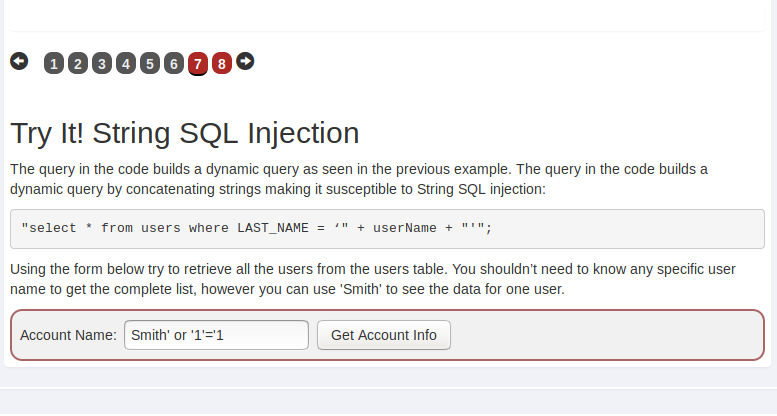
The following screen shots detail how to perform a SQL injection attack on a system. For this example, we are using to use WebGoat from OWASP.

Screen Shot 2019-03-27 at 1.49.30 PM

In the screen shot above, we see a form that is expecting a user’s account name. Instead, we have supplied the following input:

Smith' or '1'=1

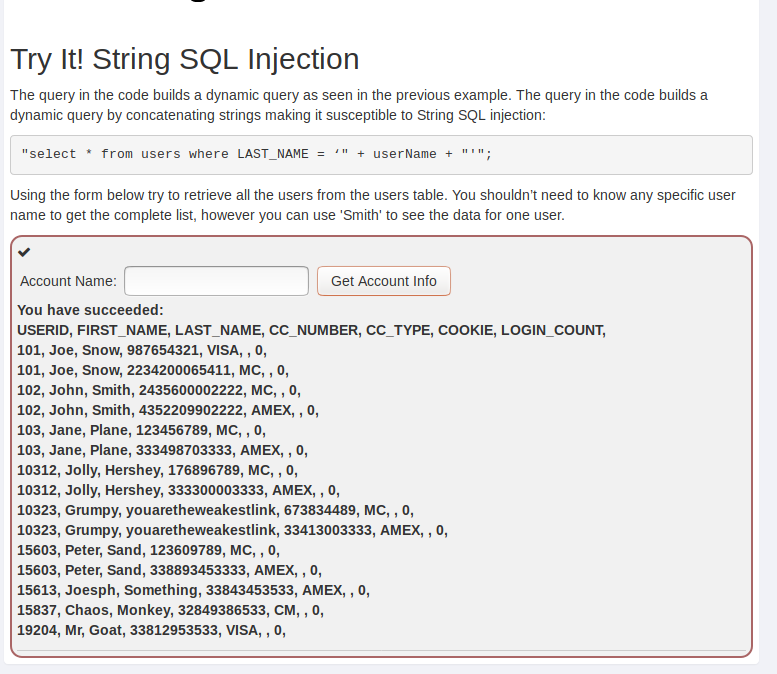
The or ‘1’=1 is the critical portion. Since this application is constructing a SQL string, the where condition evaluates to true and the application prints the entire table to the page.

Screen Shot 2019-03-27 at 1.50.04 PM

This may seem like a trivial example, but it’s a good one nevertheless because it’s easy to see the basic methodology of the attack. The attacker is inserting commands into the application. The application is not defensively programmed and therefore doesn’t check for things such as the comment character, the word or, or Boolean expressions such as ‘1’=’1′.  The result is that the command is passed to the DBMS and it returns the entire contents of the table.

Additionally, the application fails to validate the output as well. Did we really mean to show the entire database table on this page or just the result of one user account? Also, why does the application have to show fields such as USERID, FIRST_NAME, LAST_NAME etc. We also should not be showing the user anything that represents the internal makeup of the database for both usability and security purposes.

Lastly, we need to consider error handling. Let’s look at these two screen shots.

Screen Shot 2019-03-27 at 1.55.05 PM

Screen Shot 2019-03-27 at 1.55.47 PM

The first example looks like a regular error message. It’s the second example that’s the problem. In this case, we get “expected token: 1” which is an error message from the database. We never want to show this, for both usability reasons but also security reasons. An attack is going to look at error messages and try and determine the internal makeup of the application. If we aren’t careful, they can learn a lot about your system.

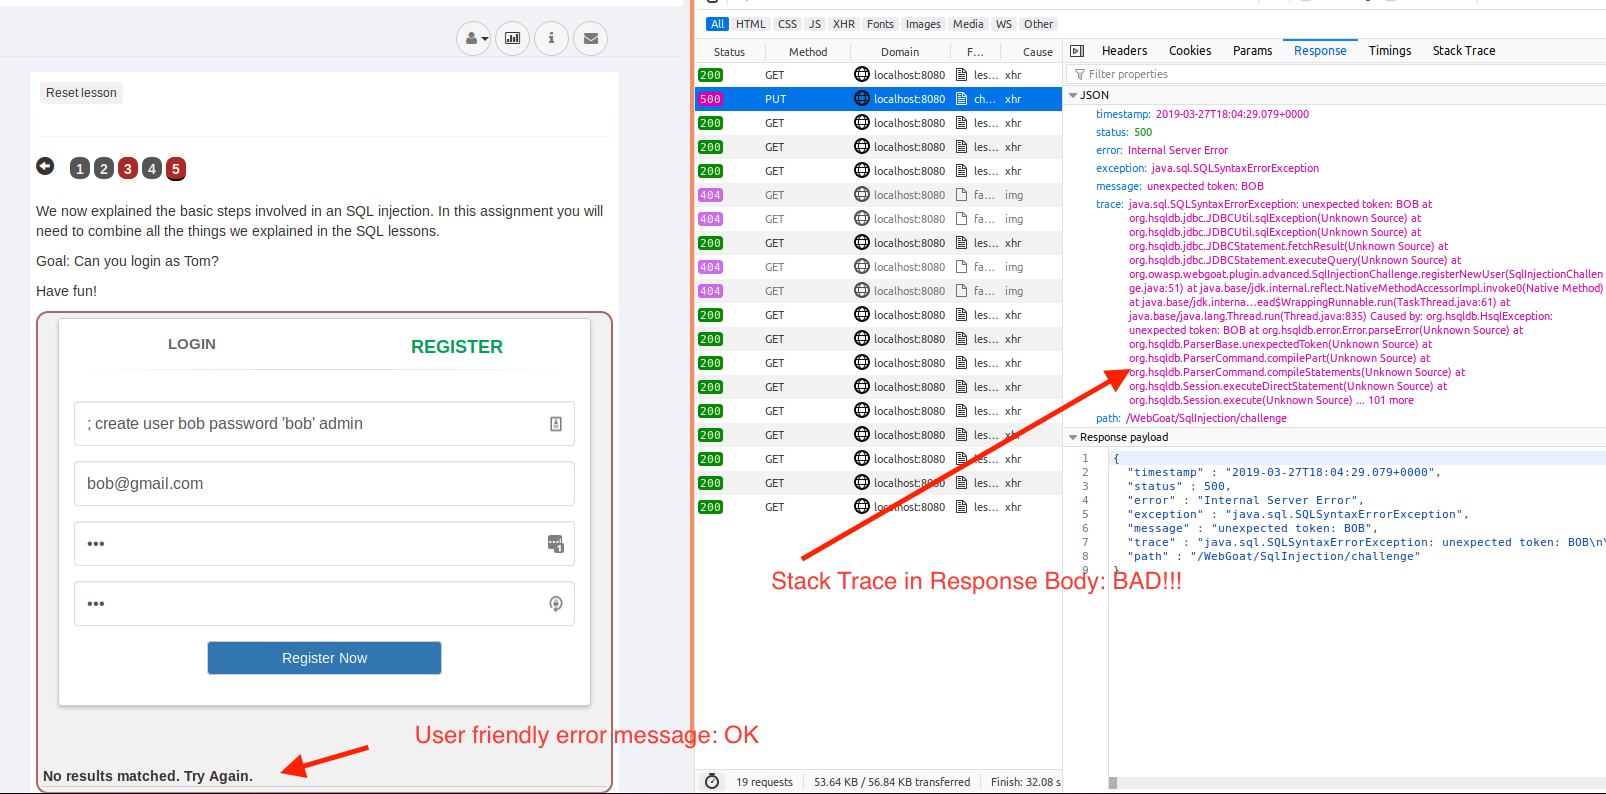
Most developers know not to show error messages like this, but here is one that is often overlooked where the develop showed a user friendly error message on the page, but allowed the stack trace to leak into the response body.

Screen Shot 2019-03-27 at 2.05.01 PM

Defending Against SQL Injection

#1 Prepared Statements and Parameterized Queries

Rather than constructing SQL queries by combining strings and sending them to the DBMS, the application should make use of prepared statements and parameterized queries. This will cause the DBMS to treat the parameters and input rather than as executable commands. For example, instead of

query = 'SELECT * FROM USERS WHERE USER_NAME = ' + user_name

Use query parameters

query = 'SELECT * FROM USERS WHERE USER_NAME = ?'
cur.execute(query, [user_name])

By using query parameters, the DBMS will treat commands such as ‘1’=’1′ as an input rather than a command and will protect your application.

#2 Stored Procedures

Stored procedures have two benefits. One benefit is that parameters in the query are usually treated as inputs rather than as commands, which helps to keep the application safe. Another benefit is that most database developers do not typically create dynamic SQL in such procedures. Finally, application libraries will often escape content in the parameters that are passed to a stored procedure.

It should be noted that all stored procedures should be properly threat modeled and tested to ensure that they are save to use. Also, it’s critical to make sure that such procedures are run with least privilege when executed. Providing elevated privileges to such procedures can cause them to run amok and threaten the application.

#3 White List User Input

Prior to passing any input to the DBMS, the application should check the input against a white list of allowed values. Any input that is not on the white list should be rejected and considered to be unsafe. For example, if your application is expecting a number, then your white list should contain a list of allowed numbers. This will keep users from supplying text SQL commands.

#4 Escaping User Input

There are a variety of libraries and functions that can escape characters in a SQL string and keep them from being interpreted as commands. For example, your application should escape the line comment character sequence “–” or words such as “WHERE”, “OR”, “UNION”, or “JOIN”

Conclusion

SQL Injection is dangerous, but it is not impossible to protect against. Like most injection style attacks, it’s important that you validate your input and make sure that your application is only sending allowed input to the DBMS. By following the best practices outlined above, you will reduce many areas where your application is vulnerable to SQL injection and other forms of attacks.

Sources

OWASP: Sql Injection Cheat Sheet

OWASP: Web Goat

Python: SQLite

Kotlin Enum

How to use Kotlin Enum classes

Understanding Kotlin Enum

By Patrick Luck

Introduction

The enum class was one of the features of Java that has been brought over to Kotlin. At their core, Kotlin enum classes are classes that are declared by using the enum keyword in front of the class keyword. Since kotlin enum classes are classes, they are free to include methods, attributes, and they can even implement interfaces.

Enums are best used when you need to group a set of constants together. By grouping the constants into a single type, you can pass the type of the enum as a method parameter or use it as a return type later on in the program. Since you now have the benefit of having compiler checks, you are less likely to experience bugs in your program plus the added benefit of improvement readability in your code.

Enums can be highly flexible since they allow you to have attributes on them as well as methods. Allowing enums to implement interfaces allows for polymorphism, so you can keep your code loosely coupled which helps to maintain code. You can also add additional properties to a kotlin enum class if you need to store more information about a constant. Let’s look at a few uses of kotlin enum classes to best understand how to use them.

Declaring a Kotlin Enum

Example Kotlin Enum

enum class FoodMenu {
    BURGER,
    CHICKEN,
    GYRO
}

Explanation

Let’s suppose we have a restaurant that serves food and the food on the menu will never change. We should certainly represent that food in some sort of a class, but since we know it’s going to be constant, we can use an enum for it. In our case, we have three constants, BURGER, CHICKEN, and GYRO. We are free to add other items to the menu later on should we choose to do so but for now, we will stick with just the three food items.

It is simple enough to declare a kotlin enum. All we need to do is use the keywords enum class followed by our curly braces and then a comma separated list of constants. In this way, the enum class in Kotlin isn’t much different than the ones we see in Java. As a matter of fact, this is one of the features of Java that become available after Java 1.5 and is still widely used today.

There is an immediate advantage to using the enum. Right away, whenever we see FoodMenu.GYRO in our code, we know that GYRO belongs to FoodMenu. Had we used a regular constant, we would see GYRO but there is no context for having GYRO in our code. Should another developer come in and read our code, they will know that GYRO belongs to FoodMenu thanks to the fact that it’s an enum.

Using kotlin enum as a parameter

fun printMenuItem(foodMenu : FoodMenu)

fun printMenuItem(foodMenu: FoodMenu){
    when(foodMenu){
        FoodMenu.BURGER -> println("Burger")
        FoodMenu.CHICKEN -> println("Chicken")
        FoodMenu.GYRO -> println("Gyro")
    }
}

fun main(args: Array){
    printMenuItem(FoodMenu.BURGER)
    printMenuItem(FoodMenu.GYRO)
}

Explanation

One of the main uses for a Kotlin enum class is to use it as a parameter of a method. In the above example, we have declared a function printMenuItem that takes a FoodMenu as a parameter. Inside of the body of the function is a kotlin when function call that acts like a switch statement and reacts accordingly. Since we used an enum as a parameter rather than a Long or a String, the compiler can check for us that all case statements are covered. Not only does this make the code more readable, but it also makes it more robust since if we add more food items later on to our kotlin enum class, the compiler will force use to either add an else branch to the kotlin when or add the new food item to it.

Later on in the code example, we call the printMenuItem function in the main function. As you can see from the code, we are passing in FoodMenu.BURGER and FoodMenu.GYRO into the parameter. Anyone who is reading this code will see that these constants are FoodMenu items and will understand the purpose of the constants.

Advanced Enums

PrintableFood and Displayable

interface Displayable {
    fun diplay()
}

enum class PrintableFood(val displayName : String) : Displayable {

    BURGER("Burger") {
        override fun diplay() = println(this.displayName)
    },
    CHICKEN ("Chicken Sandwich") {
        override fun diplay() = println("Printing ${this.displayName}")
    },
    GYRO ("Pork Gyro") {
        override fun diplay() = println("Getting a Greek ${this.displayName}")
    }
}

fun displayMenuItem(displayable: Displayable)
        = displayable.diplay()

fun main(args: Array){
    PrintableFood.values().forEach { it -> displayMenuItem(it) }
}

Explanation

As mentioned earlier, kotlin enum classes can have attributes and methods. This example starts with an interface Displayable that declares a display() method. Next we have a kotlin enum class that will implement the interface. You will notice that this class has a constructor that takes a String parameter and it also implements the Displayable interface.

Let’s start with the attribute first. Since this enum has a displayName property, it will have to initialize that property. We do that by adding a () after the name of the constant and passing a value to it. This is why you now see BURGER (“Burger”) rather than BURGER. Going forward, we can now call PrintableFood.BURGER.displayName and it will have the “Burger” String stored in that variable. We actually use the property when we implement the display() method in the class.

Just like in Java, a kotlin enum can implement an interface. However, each instance of the enum has to implement the interface, which is why we now have a class body after each declaration of the enum. This can allow for additional polymorphism in the class since each value in the enumeration isn’t forced to have the same implementation as the others.

Since PrintableFood implements Displayable, it can be used in any method that takes a Displayable variable. We see this in the main method where we go through each value in the PrintableFood enum and call displayMenuItem on it. Each value in PrintableFood will call the proper implementation of display() and print the correct value to the console.

Conclusion

Whenever you need to group constants together, you should consider using a kotlin enum. Doing so will make your code more readable and it will even offer protection against bugs through compiler checks. Since kotlin enum classes are just like any other class, they are free to declare attributes, methods, and even implement interfaces. For this reason, they are highly flexible and can be used to develop robust, readable, and loosely coupled code.

Enums also work great with kotlin when since the compiler will check and make sure that all cases of the enumeration are covered. This will help you maintain your code later on as you add values or remove them from your enum class. The kotlin compiler will force you to cover all cases of the enum or add an else block to it.

Github

You can get the code at https://github.com/archer920/Kotlin-Enum

You may also like

  1. Three uses for kotlin when
  2. Consuming REST with Spring and Kotlin
  3. Kotlin Scheduling Tasks with Spring Boot
  4. Kotlin Command Line Compile
  5. Kotlin String Formatting

Sources

  1. https://kotlinlang.org/docs/reference/enum-classes.html
  2. https://kotlinfrompython.wordpress.com/2017/10/16/enum/
  3. https://en.wikipedia.org/wiki/Enumerated_type
  4. http://www.codemag.com/Article/050104/Improve-Code-with-Enums
  5. https://docs.oracle.com/javase/tutorial/java/javaOO/enum.html

Three uses for Kotlin When

Three uses for Kotlin When

Replace the if when

By Patrick Luck

Introduction

The kotlin when extension function is part of the Kotlin standard library and it is used to replace both the switch statement as well as the if-else statements. It is critical that you understand when to use the kotlin when function because when used properly, when can greatly increase the readability of your code. There are three primary different uses where using kotlin when is practical. The first case is comparing a value and then executing the proper branch of code when a true condition has been found. The second involves returning a value based on a try condition. Finally, when is also useful for exception handling.

Like switch and if-else, kotlin when allows you to specify a default case that will execute when none of the specified conditions have been found. A default case is optional as long as when is not being used to return a value. In other words, should you use the kotlin when function to return a value, you will be forced to include an else block in the function or the compiler will flag an error. However, as long as you are not returning a value by using kotlin when, you will not be required to have a default case. Let’s take a look at a few examples of using when in a real program.

Executing a block of code based on a condition

fun throwException(name : String)

fun throwException(name: String){
    when (name) {
        "RuntimeException" -> throw RuntimeException("RuntimeException")
        "IllegalArgumentException" -> throw IllegalArgumentException("IllegalArgumentException")
        "IndexOutOfBoundsException" -> throw IndexOutOfBoundsException("IndexOutOfBoundsException")
        else -> println("Not an exception")
    }

}

Explanation

Here is a function that throws an exception based on the name String parameter. In this case, we are using the kotlin when function to replace a switch or an if-else-else-if block. As you can see, the kotlin when function makes the code highly readable. We start by passing the name variable to when which allows the function to compare the value in name to the values listed on the left side of the ->. Our first value is “RuntimeException” so when name == “RuntimeException” the code to the right of the -> will execute and a RuntimeException is thrown.

The same logic holds true for the two other cases as well. When name == “IllegalArgumentException” the code to the right of -> next to “IllegalArgumentException” is executed and an IllegalArgumentException is thrown by the JVM. The same is also the case for “IndexOutOfBoundsException”.

Finally, we also have an else in this when function. The else acts like a default in a Java switch statement or as an else in an if block. In our case, when name isn’t “RuntimeException”, “IllegalArgumentException”, or “IndexOutOfBoundsException”, then the code to the right of the -> next to the else block executed and we print “Not an exception” to the console.

Exception Handling

fun handleException(name : String)

fun handleException(name : String){
    try {
        throwException(name)
    } catch (e : Exception){
        when (e) {
            is IllegalArgumentException -> println("Handling an IllegalArgumentException")
            is IndexOutOfBoundsException -> println("Handling an IndexOutOfBoundsException")
            is RuntimeException -> println("Handling a Runtime Exception")
        }
    }
}

Explanation

This is an example of when we are using the kotlin when function for exception handling. Developers who are familiar with Java will likely remember using multiple catch blocks for each kind of exception that they wanted to handle. Every kind of unique exception type had to have its own catch block until Java 7 when multi-catch handlers were introduced for when you wanted to use the same code to handle different exception types. However, using a unique catch block for every kind of or groups of exceptions was cumbersome and lead to a lot of boiler plate in your code.

Kotlin addressed this issue by allowing the when function to be combined with the is operator. Keep in mind that “is” is used to compare the type of an object with a class to see if object is of a specific type and return true or false accordingly. That means we have a boolean operation here which allows it to be used with when. For example, when e is IllegalArgumentException, we execute the code to the right of the -> and print “Handling an IllegalArgumentException”. Not only does this improve the readability of the code by allowing for a plain english construct, but we also do away with all of the catch blocks that we would have needed in Java.

Returning a value

fun returnFromWhen(name : String): Class?

fun returnFromWhen(name : String): Class? {
    return when(name){
        "RuntimeException" -> RuntimeException::class.java
        "IllegalArgumentException" -> IllegalArgumentException::class.java
        "IndexOutOfBoundsException" -> IndexOutOfBoundsException::class.java
        else -> {
            println("Returning a null value")
            null
        }
    }
}

Explanation

Our final case is for using when to return a value. This is a powerful construct because it allows us to avoid declaring intermediate variables in a function just for the purpose of returning a value. It also allows us to avoid multiple exit points in a function which many developers consider to be a bad practice since it can be prone to bugs.

Since when is a function, it can be combined with the return keyword to return a value. Should you decide to use this feature, you will need to keep in mind that the returning value needs to be the last statement in a block of code following the -> in each case of the when. The type of return value also had to be declared in the calling function as well, which is what we have in the function declaration.

The kotlin when function works the same as it does in the other two cases. We pass a variable to it and then compare it to the separate cases. The only difference is that the final statement in the code of the -> needs to be a return value of some sort. In our case, we are returning Class objects that extend from RuntimeException. Our function has also been declared as nullable so that we can return null. After each case in the when block, we return a Class object, except for the else case which returns null.

You will notice also that the else part has { } that wraps multiple statements. This can always be done with the kotlin when function and will allow you to execute a block of code when it is needed.

Conclusion

As you may have noticed, the kotlin when function is a great tool to use when you need to increase the readability of your code by allowing you to avoid if else statements. It is also more powerful than the Java switch statement, as you are free to use any boolean condition in the when statement. The most common patterns for using kotlin when is to execute a block of code, exception handling, and returning a value.

Many developers execute a block of code using kotlin when just as if they are using a Java switch statement. In this case, we are checking a value against different conditions and then acting accordingly. Using kotlin when in this fashion is more flexible than using a switch statement, because you are not limited to just numeric or String values. Kotlin when allows you to do any legal comparisons which makes it more powerful than a Java switch statement.

The kotlin when function is also used to avoid a messy list of catch blocks when you are handling exceptions. Instead, you can use the “is” operator to check the type of your exception object and respond as needed to the exception. This allows for more compact exception handling than what you can normally achieve in Java.

Finally, since kotlin when is a function, you can use it to return a value. This allows you to avoid having multiple exit points in your function and you can avoid needing to declare an unnecessary variable. Once again, this makes your code more concise and readable that what you can normally achieve in other programming languages.

Github

You can find the entire code for this post at https://github.com/archer920/Koltin-When-Exception

Sources

  1. https://kotlinlang.org/docs/reference/control-flow.html
  2. http://www.baeldung.com/kotlin-when
  3. https://www.programiz.com/kotlin-programming/when-expression
  4. https://antonioleiva.com/when-expression-kotlin/
  5. https://www.tutorialkart.com/kotlin/when-expression-in-kotlin/

Consuming REST with Spring and Kotlin

Spring 5 came with official support for Kotlin, a JVM language developed by Jetbrains which focuses on code clarity and conciseness. Many web applications today are a mockup of content from other websites, which are usually exposed with a web service. Consuming a web service is really easy when you use Spring’s RestTemplate class. This tutorial is an adaptation of the one found here, which has been modified to use the Kotlin language.

Project Structure

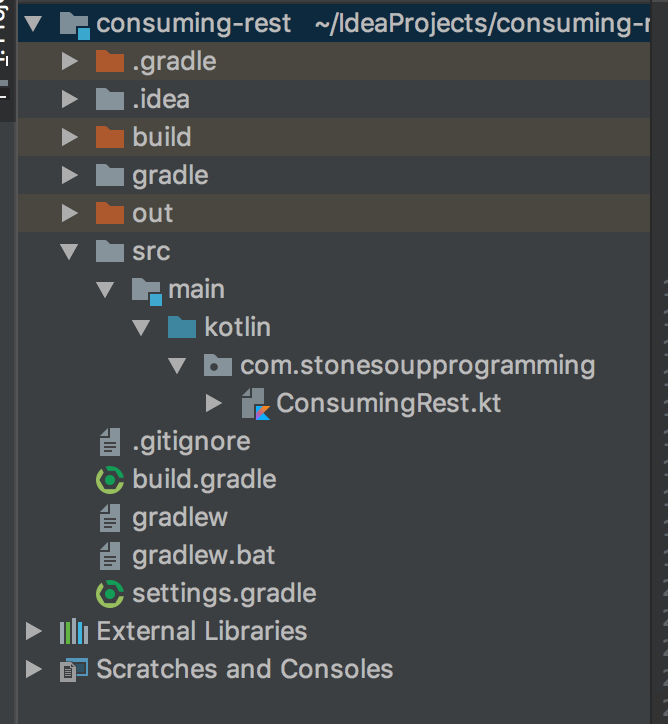
You will want to setup your project with a folder structure that is similar to the one shown in the screenshot below.

consuming_rest

build.gradle

Next you will want to use a dependency management system, either gradle or maven, which will see to the details of downloading your dependencies. We use gradle in this tutorial.

buildscript {
    ext.kotlin_version = '1.2.30'

    repositories {
        mavenCentral()
    }
    dependencies {
        classpath "org.jetbrains.kotlin:kotlin-gradle-plugin:$kotlin_version"
        classpath("org.springframework.boot:spring-boot-gradle-plugin:2.0.1.RELEASE")
    }
}

group 'com.stonesoupprogramming'
version '1.0-SNAPSHOT'

apply plugin: 'kotlin'
apply plugin: 'org.springframework.boot'
apply plugin: 'io.spring.dependency-management'

bootJar {
    baseName = 'gs-consuming-rest'
    version =  '0.1.0'
}

repositories {
    mavenCentral()
}

dependencies {
    compile "org.jetbrains.kotlin:kotlin-stdlib-jdk8:$kotlin_version"
    compile group: 'org.jetbrains.kotlin', name: 'kotlin-reflect', version: '$kotlin_version'
    compile("org.springframework.boot:spring-boot-starter")
    compile("org.springframework:spring-web")
    compile("com.fasterxml.jackson.core:jackson-databind")
}

compileKotlin {
    kotlinOptions.jvmTarget = "1.8"
}
compileTestKotlin {
    kotlinOptions.jvmTarget = "1.8"
}

ConsumingRest.kt

Now we are going to write a simple Kotlin application which will make an HTTP GET request to a server and deserialize the JSON into Kotlin object. We will use two data classes and then write a main function. Here is the code.

package com.stonesoupprogramming

import com.fasterxml.jackson.annotation.JsonIgnoreProperties
import org.springframework.web.client.RestTemplate

/**
 * The following data classes are instantiated by Jackson and converted from JSON to
 * objects. Normally, the class needs to have all of the properties in the JSON, but
 * we can change this by using the ignoreUnknown = true argument
 */
@JsonIgnoreProperties(ignoreUnknown = true)
data class Value(var id: Long = 0, var quote: String = "")

@JsonIgnoreProperties(ignoreUnknown = true)
data class Quote(var type : String = "", var value : Value? = null)

fun main (args : Array){
    //Create a new RestTemplate and use getForObject to make a GET request
    //to the server and return an instance of Quote representing the response
    val quote = RestTemplate().getForObject("http://gturnquist-quoters.cfapps.io/api/random", Quote::class.java)

    //Print the response to the console
    println(quote)
}

Our application begin by declaring two data classes which are Value and Quote. We annotate these classes with @JsonIgnoreProperties which allows the JSON deserializer to skip over JSON properties that are not present in our data classes. Otherwise, we would get a runtime exception. The JSON deserializer uses reflection (java based) to instantiate objects from the data classes so we need some form of a default constructor. We can do this a number of different ways in Kotlin, but I chose to use default values the properties in the data classes.

Next we have a main function. It starts by creating a new RestTemplate object and calling its getForObject method. The getForObject requires a web address and a class of the object to return. Then we call println on the returned Quote object to print the output to the console.

RestTemplate has methods for just about every HTTP verb so while this example only uses GET, you can do POST, PUT, DELETE and other common web requests.

Output

The output will different every time you run the application, but here is what I got when I ran it.

14:47:14.091 [main] WARN org.springframework.http.converter.json.Jackson2ObjectMapperBuilder - For Jackson Kotlin classes support please add "com.fasterxml.jackson.module:jackson-module-kotlin" to the classpath
14:47:14.156 [main] DEBUG org.springframework.web.client.RestTemplate - Created GET request for "http://gturnquist-quoters.cfapps.io/api/random"
14:47:14.247 [main] DEBUG org.springframework.web.client.RestTemplate - Setting request Accept header to [application/json, application/*+json]
14:47:14.321 [main] DEBUG org.springframework.web.client.RestTemplate - GET request for "http://gturnquist-quoters.cfapps.io/api/random" resulted in 200 (OK)
14:47:14.322 [main] DEBUG org.springframework.web.client.RestTemplate - Reading [class com.stonesoupprogramming.Quote] as "application/json;charset=UTF-8" using [org.springframework.http.converter.json.MappingJackson2HttpMessageConverter@cc43f62]
Quote(type=success, value=Value(id=1, quote=Working with Spring Boot is like pair-programming with the Spring developers.))

Conclusion

Here is the source document for this tutorial.

https://spring.io/guides/gs/consuming-rest/

You can get the code at my github at this address: https://github.com/archer920/consuming-rest

Kotlin Scheduling Tasks with Spring Boot

Kotlin is fully interoperable with Spring Boot which makes Spring and Kotlin a perfect companion to one another. Spring brings a high level platform that can be used for making just about any enterprise grade application, while Kotlin offers language features that make your code concise and readable. Both Kotlin and Spring do a great job of reducing boilerplate in your code so that you can write an application quickly and get to the point.

This tutorial is based on Scheduling Tasks found on the Spring website is an adapation of the tutorial for Kotlin. We will be using Kotlin, Spring Boot, and Gradle. You can find the code here.

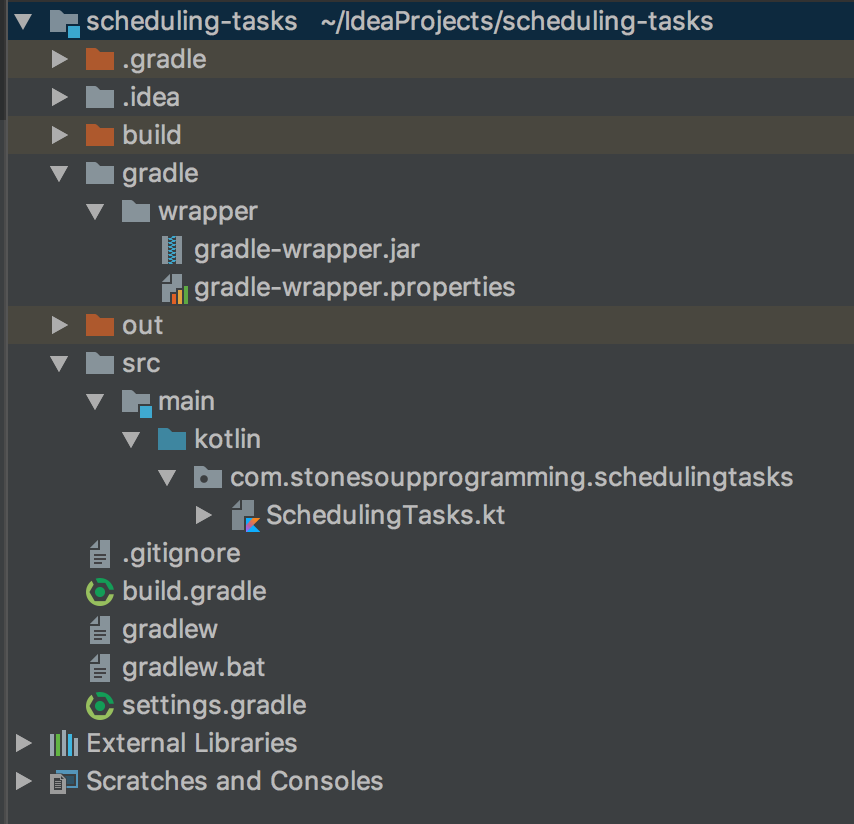
Project Structure

You should setup your project to use this folder structure.

scheduling_tasks

build.gradle

Here is the full code for your gradle.build file. Notice that will bring in both Kotlin and Spring libraries so that we can build the project.

buildscript {
    ext.kotlin_version = '1.2.30'

    repositories {
        mavenCentral()
    }
    dependencies {
        classpath "org.jetbrains.kotlin:kotlin-gradle-plugin:$kotlin_version"
        classpath "org.springframework.boot:spring-boot-gradle-plugin:2.0.1.RELEASE"
    }
}

group 'com.stonesoupprogramming'
version '1.0-SNAPSHOT'

apply plugin: 'kotlin'
apply plugin: 'java'
apply plugin: 'eclipse'
apply plugin: 'idea'
apply plugin: 'org.springframework.boot'
apply plugin: 'io.spring.dependency-management'

repositories {
    mavenCentral()
}

bootJar {
    baseName = 'gs-scheduling-tasks'
    version =  '0.1.0'
}

sourceCompatibility = 1.8
targetCompatibility = 1.8

dependencies {
    compile "org.springframework.boot:spring-boot-starter"
    compile "org.jetbrains.kotlin:kotlin-stdlib-jdk8:$kotlin_version"
    compile group: 'org.jetbrains.kotlin', name: 'kotlin-reflect', version: '1.2.30'
    testCompile "junit:junit"
}

compileKotlin {
    kotlinOptions.jvmTarget = "1.8"
}
compileTestKotlin {
    kotlinOptions.jvmTarget = "1.8"
}

SchedulingTasks.kt

Here is the Kotlin code followed by an explanation.

package com.stonesoupprogramming.schedulingtasks

import org.slf4j.LoggerFactory
import org.springframework.boot.SpringApplication
import org.springframework.boot.autoconfigure.SpringBootApplication
import org.springframework.scheduling.annotation.EnableScheduling
import org.springframework.scheduling.annotation.Scheduled
import org.springframework.stereotype.Component
import java.time.LocalDateTime
import java.time.format.DateTimeFormatter

/**
 * Mark this class an injectable component so that the Spring environment will create
 * an instance of this class when it starts up.
 */
@Component
class ScheduleTasks {

    private val logger = LoggerFactory.getLogger(ScheduleTasks::class.java)

    /**
     * This @Schedule annotation run every 5 seconds in this case. It can also
     * take a cron like syntax.
     * See https://docs.spring.io/spring/docs/current/javadoc-api/org/springframework/scheduling/support/CronSequenceGenerator.html
     */
    @Scheduled(fixedRate = 5000)
    fun reportTime(){
        logger.info("The time is now ${DateTimeFormatter.ISO_LOCAL_TIME.format(LocalDateTime.now())}")
    }
}

@SpringBootApplication
//Required to tell Spring to run tasks marked with @Scheduled
@EnableScheduling
open class Application

fun main(args : Array){
    SpringApplication.run(Application::class.java)
}

When run, you will get this output on your console every five seconds.

2018-04-06 18:51:21.868  INFO 20294 --- [pool-1-thread-1] c.s.schedulingtasks.ScheduleTasks        : The time is now 18:51:21.865
2018-04-06 18:51:26.858  INFO 20294 --- [pool-1-thread-1] c.s.schedulingtasks.ScheduleTasks        : The time is now 18:51:26.858

Explanation

So how does the code work? The ScheduleTasks class is annotaded with @Component, which the Spring environment scans for on start up and instantiates the class. At this point, an instance of ScheduleTasks lives in the ApplicationContent. You will notice that the ScheduleTasks::reportTime function is annotated with @Scheduled which defaults to a fix rate or can use a CRON like syntax.

You can’t annotate a method and expect it to run without turning on scheduling. That is why the Application class is annotated with @EnableScheduling. This will tell Spring to scan all container managed classes and look for the @Scheduled annotation. The Spring environment will do the job of making sure that the methods run at the proper time.

Code

You can get the code for this tutorial at my GitHub: https://github.com/archer920/scheduling-tasks

Sources

https://spring.io/guides/gs/scheduling-tasks/
https://docs.spring.io/spring/docs/current/javadoc-api/org/springframework/scheduling/support/CronSequenceGenerator.html

Build a RESTful Web Service with Kotlin

Introduction

Spring and Kotlin combine together to create a powerhouse when it comes to rapid application development. The Spring project is a powerful framework that allows you to develop an application quickly with as little boilerplate and configuration code as possible. Kotlin is a language that is developed Jetbrains that focuses on code readability and conciseness. This guide will show you how to build a RESTful web service using Spring Boot and Kotlin.

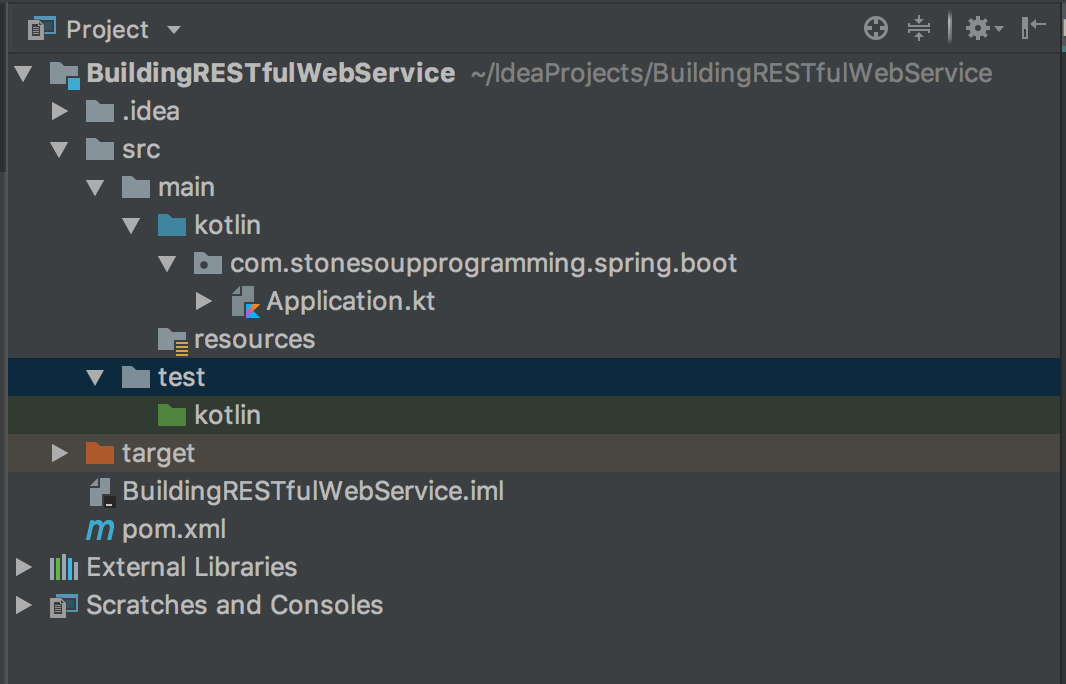
Getting Started

We will use a Maven project to mranage the resources that this application will need. Your project will need the following folder skeleton before you can continue.

Maven

After you have created your project skeleton you can continue.

pom.xml

The pom.xml file is used by Maven to manage all of your project dependencies. You can copy and paste this code into your pom.xml file, which will pull in all of the Spring Boot and Kotlin dependencies.


    4.0.0

    stonesoupprogramming
    BuildingRESTfulWebService
    1.0-SNAPSHOT

    
        1.2.31


        org.springframework.boot
        spring-boot-starter-parent
        2.0.0.RELEASE


            org.jetbrains.kotlin
            kotlin-stdlib-jdk8
            ${kotlin.version}
        
        
            org.jetbrains.kotlin
            kotlin-reflect
            ${kotlin.version}
        
        
            org.reflections
            reflections
            0.9.10
        
        
            org.jetbrains.kotlin
            kotlin-test
            ${kotlin.version}
            test


            org.springframework.boot
            spring-boot-starter-web
        
        
            org.springframework.boot
            spring-boot-starter-test
            test
        
        
            com.jayway.jsonpath
            json-path
            test


        src/main/kotlin
        
            
                org.springframework.boot
                spring-boot-maven-plugin
            
            
                org.jetbrains.kotlin
                kotlin-maven-plugin
                ${kotlin.version}
                
                    
                        compile
                        compile
                        
                            compile


                        test-compile
                        test-compile
                        
                            test-compile


                    1.8


            spring-releases
            https://repo.spring.io/libs-release


            spring-releases
            https://repo.spring.io/libs-release


Application.kt

Kotlin is a language that is meant to be concise, which plays to our advantage. We will hold all of our classes inside of the Application.kt file.

package com.stonesoupprogramming.spring.boot

import org.springframework.boot.SpringApplication
import org.springframework.boot.autoconfigure.SpringBootApplication
import org.springframework.web.bind.annotation.RequestMapping
import org.springframework.web.bind.annotation.RequestParam
import org.springframework.web.bind.annotation.RestController
import java.util.concurrent.atomic.AtomicLong

/**
 * This class gets converted into JSON and serves as our data model.
 * We can use Kotlin's data class feature to make it only one line of code.
 */
data class Greeting (val id : Long, val content : String)

/**
 * The @RestController annotation tells the Spring Environment to
 * use this class to handle REST requests. That means that it will handle
 * HTTP requests but does not use a view technology to write the response.
 * Instead, an instance of Greeting is simply converted into JSON and written
 * to the HTTP response body.
 */
@RestController
class GreetingController {

    private val counter : AtomicLong = AtomicLong()

    /**
     * The @RequestMapping signals that this method will handle
     * HTTP requests to /greeting. We can narrow it down to GET, POST, PUT, etc
     * when we want different methods to handle different requests
     * at this endpoint.
     *
     * The name parameter is annotated with @RequestParam which has
     * two arguments. The name argument maps the request parameter name to
     * the name argument in this method. The defaultValue will populate
     * name with the value "World" if the request does not have a name argument.
     */
    @RequestMapping("/greeting")
    fun greeting(@RequestParam(value="name", defaultValue="World") name : String) : Greeting {
        return Greeting(counter.incrementAndGet(), "Hello $name")
    }
}

/**
 * The @SpringBootApplication is a meta annotation that makes
 * this application executable.
 */
@SpringBootApplication
open class Application

/**
 * Now we just need an entry point to the program.
 */
fun main(args : Array){
    SpringApplication.run(Application::class.java, *args)
}

Let’s break the code down into each piece.

Greeting

Greeting is a data class that has two fields, id and content. Kotlin introduced data classes to cut down on boilerplate code when using POJOs (Plain old java object). It will have all of the getters, equals, hashcode, and toString() as well as a constructor. This class will get converted into JSON and written to the response body later on in the application.

GreetingController

Spring works on a Model, View, Controller architecture so it uses Controller classes to map web requests to backend code. In this case, we are using @RestController to specify that we are not using a view technology to generate HTML and are instead going to write JSON to the HTML response body.

This class only has one method, greeting, which is annotated with @RequestMapping. You will use @RequestMapping to map HTTP requests to a method in the class. In our case, we are mapping all requests (GET, PUT, POST, DELETE) to /greeting to our greeting method. The greeting method has one argument, name, which is also annotated with @RequestParam.

The @RequestParam has two arguments, value which specifies the name of the argument in the request and the default value if the argument is not present in the request. In our case, we also called the request parameter name and we have it default to World. Inside of the method, we return a new instance of Greeting and then return it. The Spring environment will see to the details of converting it to JSON and writing it to the response.

Application

We also have an empty Application class that is marked with the @SpringBootApplication annotation. This is a meta-annotation that pulls in all of the annotations that are needed to make this program executable. We using it in the main function to start the program.

Finishing

After you start the application, you can point your browser to

http://localhost:8080/greeting and then http://localhost:8080/greeting?name=User to see the JSON output of this application.

Sources

https://spring.io/guides/gs/rest-service/

https://kotlinlang.org/docs/reference/

Source

The source code for this project is available on my github here: https://github.com/archer920/BuildingRESTfulWebService

Python Color Chooser

The tkinter library in Python comes with an askcolor function that will pull up the system’s color picker dialog. It’s really easy to use and it returns a tuple with a RGB value and a hexadecimal value. This makes it really easy for anyone who is working with colors to ask the user for a color.

from tkinter import *
from tkinter.colorchooser import askcolor


class Window(Frame):
    def __init__(self, master=None, cnf={}, **kw):
        super().__init__(master, cnf, **kw)
        self.open = Button(self, text='Pick a color', command=self.pick_a_color)
        self.exit = Button(self, text='Exit', command=self.quit)

        for b in (self.open, self.exit):
            b.pack(side=LEFT, expand=YES, fill=BOTH)
        self.pack()

    def pick_a_color(self):
        print(askcolor(parent=self, title='Pick a color'))


if __name__ == '__main__':
    win = Window(Tk())
    win.mainloop()

askcolor

The askcolor function simply shows the system’s ask color dialog window. Therefore, it will adjust to the user’s platform and look natural. You can add the parent and title arguments if you want but otherwise the defaults work just as well.

Calling the function only requires one line of code.

askcolor(parent=self, title='Pick a color')

When the user picks a color, a tuple is returned with the rgb values and the hexadecimal values.

((255.99609375, 170.6640625, 104.40625), '#ffaa68')

You will get this result if they click on cancel.

(None, None)

Notice that it is a tuple of None.